Chocolate Peanut Butter Cheesecake Bars
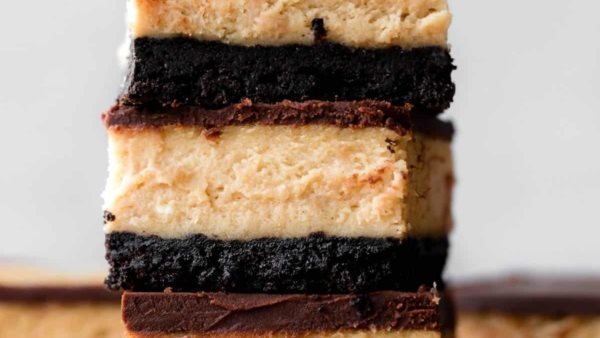
Seriously indulgent and creamy, these chocolate peanut butter cheesecake bars are like eating a peanut butter cup in cheesecake form. Quicker to bake and chill than a full cheesecake, these layered bars are the perfect choice when you need a crowd-pleasing dessert that’s also portable, easy to serve, and handheld.
Ingredients
Crust
- 30 regular Oreos
- 1/2 cup (8 Tbsp; 113g) unsalted butter, melted
Peanut Butter Filling
- 24 ounces (678g) full-fat brick PHILADELPHIA Cream Cheese, softened to room temperature
- 1 cup (200g) granulated sugar
- 1/4 cup (60g) sour cream or plain yogurt, at room temperature
- 1 cup (250g) creamy peanut butter (not natural style)
- 1 teaspoon pure vanilla extract
- 1/8 teaspoon salt
- 3 large eggs, at room temperature
Chocolate Topping
- 1/2 cup (8 Tbsp; 113g) unsalted butter
- 1 heaping cup (around 200g) semi-sweet chocolate chips
Instructions
- Preheat oven to 350°F (177°C). Line the bottom and sides of a with parchment paper, leaving an overhang on the sides to lift the finished bars out (makes cutting easier!). Set aside.
- Make the crust: In a or blender, pulse 30 Oreos (including the cream filling) into a fine crumb. You should have about 3 cups crumbs, or 330g. Pour crumbs into a large bowl. Add the melted butter and stir to combine. The mixture will be thick and quite wet. Try to smash/break up any large chunks. Pour the mixture into prepared pan. With medium pressure using your hand, pat the crumbs down into the bottom to make a compact, thick crust. Pre-bake for 10 minutes. Remove from the oven and set aside. Leave oven on.
- For the peanut butter cheesecake filling: Using a handheld or stand mixer fitted with a paddle attachment, beat the cream cheese and granulated sugar together on medium-high speed in a large bowl until the mixture is smooth and creamy, about 2 minutes. Add the sour cream and beat until fully combined. Then add the peanut butter, vanilla extract, and salt and beat until fully combined. On medium speed, add the eggs one at a time, beating after each addition until just blended. After the 3rd egg is incorporated into the batter, stop mixing. A few small lumps can remain. Whisk the filling a few times by hand to rid any large lumps at the bottom of the bowl.
- Pour the cheesecake filling onto the crust. It’s ok if the crust is still warm. Spread evenly on top with a rubber spatula or back of a spoon. (It will seem like a thick layer of cheesecake filling; that’s ok.)
- Bake for 35–38 minutes or until the cheesecake appears set on top and the edges are browned. The edges may slightly crack. (Mine do!) The bars will be puffy, but will sink slightly down as they cool. Place pan on a wire rack. Cool for 1 hour at room temperature, then chill in the refrigerator for at least 3–4 hours (and up to 1 day) before topping with chocolate. If you’re in a rush, place in the freezer for 2 hours (or until chilled throughout.) If you plan to chill the bars for longer than a few hours, loosely cover with aluminum foil after 3–4 hours of chilling.
- For the chocolate topping: Cut the butter into Tablespoon-size pieces. Place into a heat-proof bowl. Pour chocolate chips on top. Place in the microwave and melt in 30-second increments until smooth, stopping and stirring after each. You can also melt together on the stove, stirring constantly until smooth. Let the mixture cool for 2–3 minutes, then pour and spread evenly over chilled cheesecake bars. The cheesecake bars usually have a lip around the border since the center slightly sinks down, so it’s easy to spread the chocolate topping, stopping around the border/lip. If yours don’t have a raised lip around the edges, don’t worry and just spread the filling evenly all over the top.
- Chill in the refrigerator for 45–60 minutes or in the freezer for 30 minutes until the chocolate topping has set. If chilling for longer than 1 hour, loosely cover with aluminum foil after 1 hour of chilling. Chocolate topping must be completely set and solid on top of the cheesecake bars before slicing.
- To slice, lift the bars out of the pan as a whole using the parchment overhang on the sides. Cut into squares with a sharp knife. For extra neat squares, wipe the knife clean between each cut.
- Cover and store leftover cheesecake bars in the refrigerator for up to 1 week.